You can make your very own cold process soap at home using good ingredients and the oils, essential oils, colorants, and designs that you like. It’s not as hard as you might think, and you can get started quickly with just a few tools and supplies that are easy to find.
Making your own soap can be a great idea if you’re worried about what you and your family are putting on your bodies. When you make your own soap, you have full control over the process and the ingredients. Plus, it might even save you some money compared to buying fancy soaps from stores.
So, get ready to have fun making your own soap! You can choose the ingredients and create unique designs that make your soap special. It’s easier than you think, and you’ll love the results.
What Is Cold Process Soap?
Generally in soap making, you have two processes that you can use to make soap. One of them being hot process soap and the other being cold process soap.
Cold process soap is a type of soap made by combining fatty oils, lye, essential oils, and colorants. This soap is created through a process called saponification.
Saponification is a process in which a chemical reaction heats the ingredients, rather than through an outside heating source.
Why Make Cold Process Soap?
While hot process soap is made through a chemical reaction, cold process soap is made by combining the ingredients and then letting them sit for a period of time, typically around 24 hours. After this time has elapsed, the soap will have gone through saponification and be safe to use.
Cold process soap is often preferred over hot process soap because it tends to have a smoother feel, higher quality, and be less harsh on the skin. This type of soap also gives the soap maker more control over the final product.
You will find that among the available soap-making methods, cold process soap making is the most popular.
Low Barriers to Entry
Another reason cold process is the best method for beginners is that there are low barriers to entry. You do not need a lot of equipment or expensive ingredients to get started. In fact, you probably have most of what you need already in your kitchen.
All you really need is a pot, a stick blender, some measuring cups and spoons, and a mold for your soap. Of course, there are other things that you can buy to make the process easier, but they are not necessary.
Quality cold process soap recipes are available online that you can use to get started. And if you want to get really creative, you can design your own cold-process soap recipe.
Cold Process is Easily Customizable
One of the best things about cold process soap is that it is easily customizable. You can add different oils, essential oils, colorants, and other ingredients to create a soap that is perfect for you.
You can also design cold process soap to have different properties. For example, you can make a cold process soap that is more moisturizing, one that is better for sensitive skin, or one that has exfoliating properties.
The possibilities are endless when it comes to cold-process soap. So, if you are looking for a truly unique soap, this is the method you want to use.
Essential Equipment for Cold Process Soap Making
To successfully create cold process soap, you’ll need specific equipment to ensure accurate measurements and a smooth soap-making process.
Here’s a list of essential tools:
- Measuring Cups: Use measuring cups to precisely measure your ingredients, such as water and oils. Accurate measurements are crucial for achieving consistent results in your soap recipes.
- Molds: Select molds that are suitable for cold process soap making. These molds come in various shapes and sizes, allowing you to create unique soap bars. Consider using silicone or wooden molds for easy soap removal.
- Spoons: Have a set of spoons on hand for mixing your soap ingredients. Use separate spoons for each ingredient to prevent cross-contamination and maintain accuracy in your measurements.
- Spatula: A spatula helps scrape down the sides of containers and ensures all ingredients are thoroughly mixed. This promotes even distribution of additives and colorants within the soap mixture.
- Thermometer: Using a thermometer is vital for monitoring temperatures during the soap-making process. It helps determine when to combine lye solution and oils at the correct temperatures for optimal soap results.
- Safety Gloves: Protect your hands by wearing safety gloves throughout the soap-making process. Choose gloves that are chemical-resistant and provide a comfortable fit, allowing you to work safely with lye and other ingredients.
- Safety Goggles: Safeguard your eyes from potential splashes or chemical contact by wearing safety goggles. Opt for goggles specifically designed for eye protection to prevent any irritation or injury.
- Soap Pot: Use a dedicated soap pot or stainless steel pot for melting oils and mixing the soap mixture. Ensure it has enough capacity to accommodate your soap recipe while allowing room for stirring.
- Weighing Scale: A reliable weighing scale is essential for accurately measuring ingredients by weight. This ensures precision and consistency in your soap recipes, resulting in successful soap batches.
- Glass Pitcher: A glass pitcher is useful for measuring and pouring liquids. Look for one with a spout for easy and controlled pouring when combining lye with water.
- Mason Jar with Lid: A mason jar with a tight-fitting lid is ideal for storing your lye securely. It helps keep the lye protected from moisture and ensures safe storage between uses.
- Plastic Pitcher with Lid: A plastic pitcher with a lid is helpful for preparing water-based solutions and holding liquid ingredients. Look for one that is food-grade and durable.
- Stick Blender: A stick blender, also known as an immersion blender, aids in the emulsification and thorough mixing of the soap ingredients. It helps achieve a smooth and well-blended soap mixture.
Ingredients for Making Cold Process Soap
To create cold process soap, you will need a selection of key ingredients. Here’s a breakdown of the essential components:
- Distilled Water: Distilled water serves as the liquid base for your soap recipe. It is important to use distilled water to ensure purity and prevent any impurities or minerals from affecting the soap’s quality.
- Lye Flakes: Lye, also known as sodium hydroxide, is a crucial ingredient in cold process soap making. It initiates the saponification process, transforming oils into soap. Ensure you use lye specifically formulated for soap making, such as lye flakes, for accurate and safe measurements.
- Choice of Oil: Selecting the right oils is key to formulating your cold process soap. You have a range of options, including coconut oil, olive oil, sweet almond oil, and more. Each oil brings unique properties to the soap, such as lather, conditioning, or moisturizing effects. Experiment and find the combination that suits your preferences.
- Fragrance (Optional): If desired, you can add fragrance to your cold process soap to create an appealing scent. There are various fragrance options available, specifically formulated for use in soap making. Choose scents that complement your personal taste and the desired outcome of your soap.
- Coloring Pigments or Mica Colorants (Optional): For adding visual appeal, consider using coloring pigments or mica colorants. These optional additives allow you to customize the soap’s appearance. Remember to use colorants specifically designed for soap making, ensuring they are safe and stable throughout the soap-making process.
- Additive Materials (Optional): To further enhance your cold process soap, you have the option to incorporate various additives. These can include spices, natural exfoliants like oatmeal or poppy seeds, flower petals, or other natural materials. Additives provide texture, visual interest, or specific properties to the soap, based on your preferences and desired effects.
How To Make Cold Process Soap: Step-by-Step
Here are the step-by-step instructions that you need to follow to work up a cold pressed soap all by yourself.
1. Weigh the Water and Lye
Before getting started with the soap-making process, you need to weight the water and lye. So, put a pitcher on the weighing scale and zero out the weight so that you get accurate measurements of the ingredients. Pour distilled water into the pitcher until you get the desired weight that suits your specific recipe. Next, put a plastic pitcher or a mason jar on the weighing scale, further zeroing out the weight. Add lye to the jar and cover the same with its lid and put it in an undisturbed spot.
2. Combine Lye and Water
Add the lye to the water pitcher slowly, while making sure you don’t make any splashes while you pour the lye. Stir the solution very gently until all the lye dissolves well. Rinse all the tools you used for mixing the solution immediately after using them. The mixture is going to heat up, so make sure you cover the pitcher with its lid and put it in a safe spot.
3. Add the Oils to a Glass Pitcher or Soap Pot
Place the glass pitcher or the soap pot onto the weighing scale and make sure you zero out the weight on the scale. Weigh the oils you choose to use one by one by adding them into the pitcher or pot. Don’t forget to zero out the measurement after measuring each oil. It’s essential to pour the oil into the pot slowly to avoid adding unwanted amounts.
4. Put the Pot Over Heat
Turn the stove on and place the soap pot over medium-low heat to melt the oils slowly while you gently stir the same. Grab a thermometer to check the temperature, followed by turning the stove off when the oils reach a temperature of 110 degrees Fahrenheit. You need to stir the solution until all the solid oils are properly melted, further adding the liquid oils to the soap pot. It’s time to add the lye-water solution to the pot when the oil mixture reaches about 100 degrees Fahrenheit.
5. Add the Lye Solution
Add the lye-water solution to the soap pot slowly and you are going to witness the oils turn cloudy almost instantly. Start stirring the mixture properly with the help of a stick blender, but make sure you don’t turn on the blender yet. A chemical reaction called as saponification begins at this stage and the mixture starts turning into soap. Put the lye pitcher in a safe spot away from the reach of the kids or pets.
6. Mix the Oils and Lye
You need to turn on the stick blender in quick bursts while you stir the lye water and oil together. The idea is to blend for around 3-5 seconds, further turning it off and stirring some more. Repeat this and keep mixing in short bursts until the lye-water solution mixes thoroughly with the oils. The solution will then start to trace, i.e. it goes under emulsification. Take a little mixture into a spoon and allow it to flow back into the soap pot. If it leaves a track on the spoon after dribbling back, the mixture is all set. Typically, the trace is reached in just a matter of a few minutes.
7. Add Essential Oils or Fragrance
Next, you can introduce any essential oils or your favorite fragrance to the soap mixture. Make sure you do it after the mixture blends properly, but before it turns too thick. At this point, you can use the end of the stick blender to stir the solution and blend the ingredients properly.
8. Add Your Choice of Additives
You can blend in your choice of additives such as spices, petals, natural exfoliants, herbs, or moisturizing oils into the mix, further stirring them with the stick blender.
9. Throw in Coloring Agents
Add the pigments or mica coloring agents to the soap. You can either work up the soap in a single hue or go for a swirl effect. Add the color to the pot and stir well.
10. Pour the Soap Into the Mold
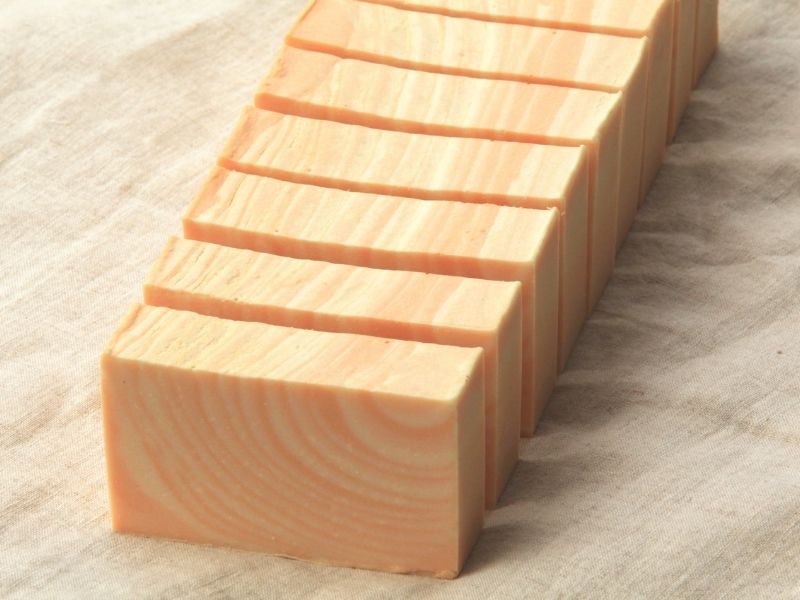
Once the soap thickens, pour the mixture into a soap mold while making sure you spread it throughout the mold properly. Use a spatula to take out the remaining bits of the mixture from the pot. Get rid of all the air bubbles trapped in the soap mix by picking the mold up and tapping the same on the countertop. Put the mold in a warm spot to allow curing and saponification. If the surroundings are cold, keep the mold warm by placing a towel around or on top of the mold.
11. Let the Soap Harden
Place the soap at an undisturbed spot and allow it to harden for about 24 hours to make it easy to unmold and cut into smaller pieces. Gently unmold the soap by sliding or popping it out, further cutting it into individual bars. It’s good to let the soap cure for about 4 weeks before putting it to use.
Pros and Cons of Cold Process Soap
Cold process soap offers several advantages and a few considerations to keep in mind. Let’s explore the pros and cons of this soap-making method.
Pros of Cold Process Soap
Customizability: Easily customize cold process soap to match your preferences. Adjust the ingredients, oils, scents, and additives to create a unique soap tailored to your needs.
Minimal Equipment: Unlike other soap-making techniques, cold process soap doesn’t require elaborate or specialized equipment. You can get started with basic tools found in most kitchens.
Longevity: Cold process soap bars tend to have a longer lifespan compared to other types of soaps. Their durability means they last longer, providing extended use and value.
Natural Glycerin: Cold process soap retains natural glycerin, which offers skin benefits. Glycerin helps moisturize and hydrate the skin, leaving it feeling soft and nourished.
Cons of Cold Process Soap
Curing Time: Cold process soap requires a curing period of a few weeks before it is ready to use. This waiting period is necessary for the soap to harden and develop its desired characteristics.
Working with Lye: The cold process soap-making method involves working with lye, which can be hazardous if not handled properly. It’s crucial to follow safety precautions and have a basic understanding of soap making to ensure safe practices.
Soap-Making Knowledge: Before attempting cold process soap making, it’s important to have some basic knowledge of soap-making techniques. Understanding the properties of oils, additives, and the saponification process will contribute to successful results.
When considering these pros and cons you can make an informed decision about whether cold process soap making aligns with your preferences, skill level, and time constraints.
Safety Tips for Cold Process Soap Making
To ensure a secure and enjoyable experience during cold process soap making, it’s crucial to prioritize safety. Follow these essential tips to protect yourself throughout the soap-making process:
Eye Protection
Wear goggles designed for eye protection to safeguard against alkali burns. These goggles create a barrier against potential splashes or contact with caustic substances like lye. Make sure they fit comfortably and provide adequate coverage.
Skin Coverage
Minimize the risk of accidental contact with lye or other caustic substances by covering all exposed skin. Opt for long sleeves, closed-toe shoes, and pants to provide a protective barrier. This helps prevent skin irritation or burns.
Consider a Dust Mask
For those sensitive to lye fumes or working with large batches, consider wearing a dust mask. This optional safety measure reduces the inhalation of particles and adds an extra layer of protection for your respiratory system.
Static Cling Awareness
Stay vigilant about static cling during the soap-making process. Lye flakes tend to adhere to shirt sleeves or gloves. Regularly check for any lye flakes and promptly remove them to avoid accidental skin contact.
Cleanup Safety
Maintain safety precautions even during cleanup. Keep your gloves and goggles on while washing utensils and tools. Use hot, soapy water to thoroughly clean equipment, ensuring the removal of any caustic soap residue that can cause burns or skin irritation.
Prioritize the well-being of yourself and others involved in the process, ensuring a positive and safe soap-making experience. These safety tips will help you create a secure environment throughout the entire cold process soap making journey.
Frequently Asked Questions
All soaps expire, even store-bought soaps. Homemade soap can go bad within 1 year of its manufacture date but can last up to 3 years depending on ingredients. This is normally due to the essential oils, and fragrance oils losing their potency and changing over time. These oils do not expire in the same way that food does, but at a certain point, they should no longer be used.
Make cold process soap harder by adding sodium lactate to cooled lye water during the soap-making process. Sodium lactate can help your soap harden and harden faster which will also assist you in releasing the soap from the molds.
As soap is curing it is losing water weight. When the soap is no longer losing weight, that means the soap has fully cured, this can take 4-6 weeks. At this point, you can prepare it for storage or wrapping.
Depending on the ingredients used to make the cold process soap. Cold process soap can harden in about 3-4 days, at that point it is safe to remove it from the molds. Once the soap is removed from the molds you can prepare it for curing.
When cold process soap is cured it can last up to 1 year. The soap will slowly lose its scent over time. This is due to the essential oils and fragrance oils used in the cold process soap recipe.
Cold process soap is made by combining lye and oils, then pouring into a mold. Hot process soap is made by cooking the lye and oils together then pour into a mold. Both methods result in soap, but cold process soap takes longer to cure then hot process soap.
There are many places you can buy cold process soap molds. You can find cold process soap molds at your local craft store, online, or even make your own cold process soap molds.
The shelf life of cold process soap is 1 year. At that point, the cold process soap will slowly lose its scent over time.
Conclusion
In conclusion, cold process soap does not have to be hard or time consuming to make. You can make your own soap at home without buying a ton of equipment and without spending a ton of time on it.
Most of the time spent making your soap will be waiting for it to harden and then waiting for it to cure.
Not to mention you get to be in full control of the process and the ingredients that go into making a product that you and your family will be using every day.