Soap making is a fun and rewarding hobby that anyone can enjoy. However, it can be a bit intimidating for beginners, especially those who are new to the craft. This is where melt and pour soap comes in – it’s an easy and safe way to make soap at home without the need for lye or other dangerous chemicals.
Melt and Pour Soap Explained
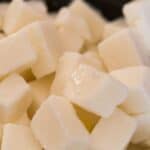
Melt and pour soap is a pre-made soap base that can be melted down and customized with your own ingredients and scents. It’s made from a combination of glycerin, oils, and other additives that make it easy to work with and gentle on the skin. Because it’s pre-made, there’s no need to handle lye, which can be dangerous if not used properly.
Benefits of Using Melt and Pour Soap
Melt and pour soap is a great option for beginners because it’s easy to work with and produces consistent results. It’s also a great way to experiment with different colors, scents, and additives without the need for expensive equipment or specialized knowledge.
Additionally, melt and pour soap is gentle on the skin and doesn’t strip away natural oils like some commercial soaps. This makes it a popular choice for people with sensitive skin or those who are looking for a more natural alternative to traditional soaps.
Equipment Needed To Make Melt and Pour Soap
To make melt and pour soap, you’ll need a few key pieces of equipment:
- Double Boiler – A double boiler is used to melt the soap base without burning it. If you don’t have a double boiler, you can create one by placing a heat-resistant bowl over a pot of boiling water.
- Digital Scale – A digital scale will help you measure ingredients accurately, which is important for consistent results.
- Mold – You’ll need a mold to pour your soap into. You can use anything from a silicone mold to an ice cube tray.
- Mixing Bowl – A mixing bowl is used to mix together your ingredients.Ingredients To Make Melt and Pour SoapOnce you have your equipment, you’ll need to gather the ingredients for your soap.
- Thermometer – A thermometer is used to monitor the temperature of your melted soap base, so it doesn’t get too hot and burn.
- Measuring cups and spoons – Accurate measurements are crucial when making soap, so be sure to have a set of measuring cups and spoons on hand.
Supplies Needed To Make Melt and Pour Soap
Whether you’re a beginner or an experienced soap maker, having the right supplies on hand is essential to ensure the best results.
Here’s a list of supplies you’ll need to make melt and pour soap:
- Soap base – The first and most important supply you’ll need is a high-quality soap base. Choose a base that’s made from natural ingredients and is free from harsh chemicals.
- Essential oils or fragrance oils – Essential oils and fragrance oils are used to add scent to your soap. Choose oils that are safe for use in soap making and that complement your other ingredients.
- Additives – Additives such as herbs, spices, and colorants can be used to customize your soap and give it a unique look and feel.
- Embeds – Embeds such as soap shapes and dried flowers can be used to create interesting patterns in your soap.
- Exfoliants – Exfoliants such as ground oats, coffee grounds, and poppy seeds can be used to create a gentle scrubbing effect.
Experiment with different ingredients and combinations to find the perfect recipe for you. Happy soap-making!
Choosing a Soap Base
There are several different types of soap bases available, each with their own unique properties and benefits.
Types of melt and pour soap bases
- Glycerin Soap Base – This type of soap base is made primarily from vegetable glycerin and is often clear or translucent. It’s known for its moisturizing properties and is a popular choice for making soap that’s gentle on the skin.
- Shea Butter Soap Base – Shea butter soap base is made with shea butter, which is known for its nourishing and moisturizing properties. It’s a popular choice for making soap that’s especially good for dry or sensitive skin.
- Goat Milk Soap Base – Goat milk soap base is made with real goat milk, which is known for its gentle cleansing properties. It’s a popular choice for making soap that’s gentle on the skin and is a good option for those with sensitive skin.
- Coconut Oil Soap Base – Coconut oil soap base is made with coconut oil, which is known for its cleansing and moisturizing properties. It’s a popular choice for making soap that’s gentle on the skin and has a luxurious lather.
Pros and cons of each melt and pour base
Each type of soap base has its own unique set of pros and cons.
Glycerin soap base is known for its moisturizing properties but can be more difficult to work with than other types of soap bases.
Shea butter soap base is great for dry or sensitive skin but can be more expensive than other types of soap bases.
Goat milk soap base is gentle on the skin but may have a shorter shelf life than other types of soap bases.
Coconut oil soap base is great for creating a luxurious lather but may not be as moisturizing as other types of soap bases.
Factors to consider when choosing a base
When choosing a soap base, there are several factors to consider. First and foremost, consider the needs of your skin.
If you have dry or sensitive skin, a shea butter or goat milk soap base may be the best choice for you. If you’re looking for a soap that’s gentle on the skin and has a luxurious lather, a coconut oil soap base may be a good choice.
Consider the final look and feel of your soap as well. Glycerin soap base is great for creating translucent soaps, while shea butter soap base is better for creating creamy and moisturizing bars.
Fragrances and Colors
One of the best things about making melt and pour soap is the ability to customize it with fragrances and colors. With so many options available, it can be overwhelming to choose the right fragrances and colors for your soap.
Let’s explore the different fragrances and color options available.
Fragrance options
You can use essential oils, fragrance oils, or a combination of both. Essential oils are derived from natural sources and can add therapeutic benefits to your soap. Fragrance oils, on the other hand, are synthetic and can come in a wider variety of scents.
When choosing a fragrance for your soap, consider the strength of the scent and how it will complement the other ingredients in your soap. It’s also important to choose a fragrance that is safe for use in soap making.
Types of colorants
There are several types of colorants available for melt and pour soap. You can use natural colorants like herbs and spices, or you can use synthetic colorants like micas and pigments.
When choosing a colorant for your soap, consider the final look you want to achieve and how the color will complement the fragrance and other ingredients in your soap.
Incorporating fragrances and colors into melt and pour soap
When incorporating fragrances and colors into your melt and pour soap, it’s important to follow a few key guidelines. First, start with a small amount of fragrance or colorant and gradually increase until you achieve the desired effect.
It’s also important to mix the fragrance or colorant thoroughly into the soap base to ensure even distribution.
When using natural colorants, you may need to experiment with different amounts to achieve the desired color. Synthetic colorants, on the other hand, are usually more concentrated and require less product to achieve the desired effect.
Molding and Cutting
Creating beautiful melt and pour soap also involves choosing the right mold and cutting the soap into the desired shape.
Choosing a mold
You can choose from silicone molds, plastic molds, or even repurpose items from around your home as a mold. When choosing a mold, consider the shape and size you want for your soap, as well as the material of the mold.
Silicone molds are a popular choice as they are flexible and easy to release the soap from. Plastic molds are also a good option, and they come in a wide variety of shapes and sizes. When repurposing items from around your home as a mold, make sure they are heat-resistant and have a smooth surface for easy soap release.
Techniques for pouring soap into molds
When pouring soap into molds, it’s important to work quickly and efficiently to prevent the soap from hardening before it’s fully poured. Start by melting the soap base and adding any fragrances, colors, or additives.
Once everything is mixed, pour the soap into the mold in a steady, slow stream to prevent air bubbles from forming. If air bubbles do form, lightly spray the top of the soap with rubbing alcohol to help them dissipate.
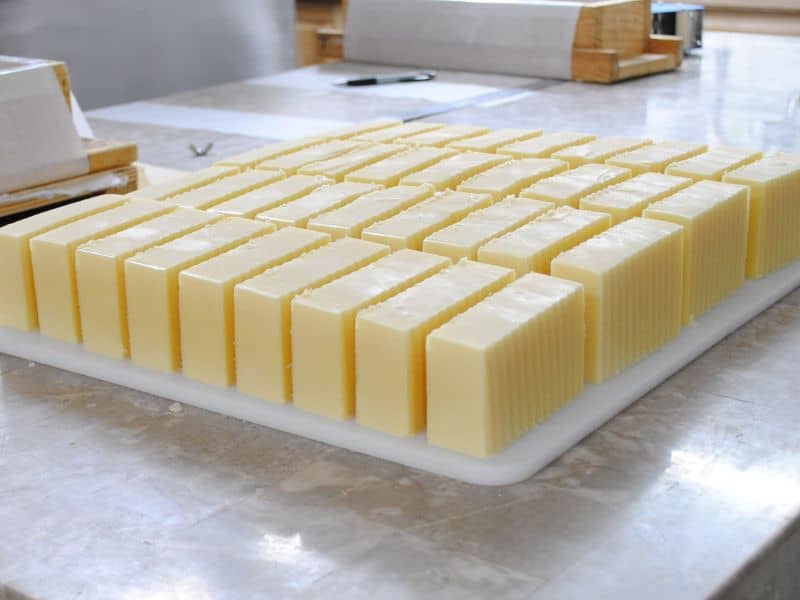
Tips for cutting soap
Once your soap has hardened and cooled, it’s time to cut it into the desired shape. A sharp knife is essential for cutting soap cleanly and evenly. You can also use a soap cutter, which is specifically designed for cutting soap and will help you achieve more uniform shapes and sizes.
When cutting soap, it’s important to work slowly and carefully to prevent the soap from cracking or breaking. You can also use a ruler or template to guide your cuts and ensure even sizes.
Customizing Melt and Pour Soap
One of the best things about making melt and pour soap is the ability to customize it in so many ways. Whether you’re looking to add exfoliants, embed objects, or create unique swirling effects, there are plenty of ways to make your soap creations truly one-of-a-kind.
Adding exfoliants
Adding exfoliants to your melt and pour soap is a great way to create a spa-like experience and help slough off dead skin cells. Some popular exfoliants include oatmeal, ground coffee, and crushed walnut shells.
When adding exfoliants to your soap, it’s important to mix them in thoroughly and evenly distribute them throughout the soap base.
Embedding objects
Another fun way to customize melt and pour soap is by embedding objects into the soap. You can embed anything from small toys to dried flowers, beads, and even seashells.
To embed an object, simply pour a thin layer of melted soap base into the mold, add the object, and then pour more soap base on top. Make sure the object is fully submerged and centered in the soap.
Swirling techniques
Swirling is a great way to create unique and eye-catching designs in your melt and pour soap. You can create swirls using different colors of soap base or by mixing in different additives like clays or activated charcoal.
To create swirls, pour one color of soap base into the mold, then add the second color in a thin stream and use a toothpick or skewer to create swirls.
Whipping
Whipping is a technique that involves adding air to the soap base to create a light and fluffy texture.
To whip soap, melt the soap base and then add a small amount of liquid glycerin. Use a whisk or hand mixer to whip the soap until it becomes light and airy, then pour it into your mold.
Troubleshooting Common Issues
Like any DIY project, things don’t always go as planned. We’ll go over some common issues that may arise when making melt and pour soap and how to troubleshoot them.
Bubbles in soap
One common issue that can occur when making melt and pour soap is the presence of bubbles in the soap. Bubbles can occur for a variety of reasons, such as using a whisk to stir the soap too vigorously or pouring the soap base too quickly into the mold.
To prevent bubbles, try stirring the soap base slowly and gently, and pour the soap slowly and evenly into the mold. If you do end up with bubbles in your soap, you can try using a toothpick or skewer to pop them before the soap sets.
Soap not releasing from the mold
Another issue that may arise when making melt and pour soap is the soap not releasing from the mold. This can happen if the mold is not properly greased or if the soap has not fully cooled and hardened.
To prevent this issue, make sure to grease your mold thoroughly before pouring in the soap, and wait until the soap has completely cooled and hardened before attempting to remove it from the mold. If the soap still won’t release, try putting the mold in the freezer for a few minutes to help loosen the soap.
Soap cracking or breaking
If your melt and pour soap is cracking or breaking, it may be due to overheating the soap base or pouring the soap too quickly into the mold. To prevent this issue, make sure to heat the soap base slowly and evenly, and pour the soap slowly and evenly into the mold.
If your soap still cracks or breaks, try adding a small amount of liquid glycerin to the soap base before pouring it into the mold. Glycerin can help make the soap more pliable and less likely to crack or break.
Frequently Asked Questions
Yes, melt and pour soap making is a great starting point for beginners as it requires minimal equipment and is easy to learn.
Melt and pour soap making allows for endless creativity and customization, as well as being a fun and cost-effective hobby.
The equipment needed for melt and pour soap making includes a soap base, a microwave or double boiler, a mixing bowl, a spoon or spatula, molds, and any desired additives like colorants and fragrances.
You can add a wide range of additives to melt and pour soap, including colorants, fragrances, exfoliants, and more.
You can melt the soap base using a microwave or double boiler. Simply chop the soap base into small pieces, place in a microwave-safe bowl, and microwave in 30-second intervals, stirring in between until melted.
Melt and pour soap typically sets within 1-2 hours, but can take longer depending on the size and shape of the molds.
Yes, you can customize the shape and size of your melt and pour soap bars by using different molds or cutting the bars into desired sizes and shapes.
Conclusion
In conclusion, melt and pour soap making is a great hobby for beginners as it requires minimal equipment and is easy to learn. With this guide, you should now have the knowledge and skills necessary to troubleshoot any issues that come up during your soap making journey. Have fun creating beautiful, custom soap bars of all shapes and sizes!